I just got the guitar…now what? (part 3)
Dec 11, 2009 Guitarists, Music Theory
So, now we know all the parts of the guitar and how to tune the guitar – great…when do we get to be the next Eddie Van Halen? Well, that might take some time. Truthfully, it might take some time to get to be the next Billy Ray Cyrus. No offense to any of those Billy Ray Cyrus fans out there (it’s fine to admit that you are a BRC fan, just not to any of your guitar playing friends). Ok, let’s take some basic steps. How about some basic concepts leading us to some basic chords.
Music is a language that consists of 12 tones. These tones are A A#(or Bb) B C C#(or Db) D D#(or Eb) E F F#(or Gb) G G#(or Ab).
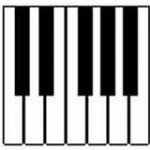
On a piano, this pattern repeats for the full length of the available keys.

For the purpose of getting started, let’s just concentrate on the natural notes – those are the ones without the sharps (#) or the flats (b). So the natural tones are as follows A B C D E F G.
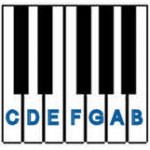
I start with the “C” because that’s the way I learned the groupings on the piano. Yes, yes, I know…this is a guitar lesson but the theory I want write about is easiest to SEE on the piano but very applicable to the guitar. Back to the “C“, I have always remembered that the key for C is the first key to the left of the grouping of 2 black keys. This follows through on the entire keyboard. That note sounds the same at each of these positions, just at different octaves. What’s an octave? Hmmm…if you have seen “The Sound of Music” (and who hasn’t?), when the nun/governess/stepmom played by Julie Andrews teaches the children to sing, she teaches them the song “Do Re Mi”.
Now unlike the piano, I can actually play the same note in multiple places on the guitar. The important portion of this is that there is spacing between the notes, musical tones that give us the different tonalities we need to create music in different keys. So if we look back at the piano:
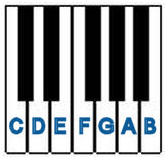
We can that there is a note between every natural tone except E and F. Actually, if you extend the keyboard you also see there isn’t a note between B and C either. That’s important. Why is that important? Well, this develops the musical spacing between notes. Since most people think in natural notes, the space between “most” of the natural notes was called aWHOLE STEP. This worked out great for everyone until a mathematician by the name of Pythagoras came up with this theory – Musica Universalis. Netting it out, this philosophical concept was figured out when Pythagoras began noticing different tonalities (musical moods) between different singers who sang in different ranges.
For more info, head over to Pythagoras’ Discovery
WHY DOES THIS MATTER TO ME? I’M A GUITAR PLAYER!!! Actually, that’s a valid question. Here’s the key – the frets of the guitar are spaced in half-steps. In other words, from the C note on the guitar, the next fret is a half-step from that note. Going higher (towards the body of the guitar) would make the next fret C#, going lower (towards the headstock of the guitar) would make the next fret B.
Tags: beginnings, guitar, theory
Pythagoras’ Discovery
Dec 11, 2009 Music Theory
In ancient Greece, singers would use a simple stringed instrument called the lyre. This had many “versions” with the most common being 4-string, 7 -string and 10-string. Pythagoras, using the 7 string lyre discovered that when tuning a lyre to “standard” tuning (let’s say it was C-D-E-F-G-A-B because it doesn’t really matter what he called the notes), discovered that the invoked mood was light. Yet when tuning another lyre a note higher (D-E-F-G-A-B-C, probably for someone who had a higher singing register) that the mood was somewhat darker. The main key here is that the same notes were played but the mood was different. This inspired Pythagoras to research why that was and what he postulated was that there exist notes between these common notes – HALF-STEPS. Therefore, the whole concept of specific musical spacing came into existence.
I just got the guitar…now what? (part 2)
Oct 27, 2009 Music Theory
Okay, so now we know what are all the parts of the guitar. Let’s look at the stuff that we will be using most – the strings, tuning pegs and the frets.
Tuning
First of all, the purpose ot the tuning pegs is to tighten or loosen the tension on the string, thereby raising and lowering the pitch of the string respectively. The strings can be tuned to any number of pitches, the standard tuning is as follows:
E – 6 -fattest string (“top” of neck)
A – 5
D – 4
G – 3
B – 2
e – 1 – thinnest string (“bottom of neck”)
I use a simple mnemonic: “Every Astronaut Does Good But Elmer”. Most people will use an electronic tuner or pitch pipe entire guitar or a tuning fork to tune a single string and then tune the rest of the strings to that reference. How does that work?
Nearly every electronic tuner has the ability to listen to the sound a string makes and tell you what the closest note is to that sound. It generally will give some sort of visual representation to the player of whether they are in tune, sharp(#) or flat (b). Tightening the string will make it closer to in tune when the tuner displays that the note is flat, conversely loosening the string will make it closer to in tune when the tuner displays that the note is sharp. Remeber to ensure you are trying to tune to the correct note for the assigned string.
A pitch pipe generally has six tubes that you can blow in to and get a reference tone to which you can tune. This helps build your ear for hearing the dissodence between notes that are not in tune with each other but can be quite a challenge for the beginner.
A tunning fork is a device that produces a single tone when struck. There are designed to play one note that can be used as a reference tone. Most guitarists that use tuning forks use forks that are tuned to “A=440hz”. That means that the fork will vibrate 440 times a second producing the perfect A note. When properly tuned your guitar’s A string (5th string) will vibrate at exactly 440 times a second. Once that string is tuned, the guitarist can tune the remaining strings in reference to that string (more on that later).
Or you could just use this one from Guitar For Beginners.com :
Now back to the stuff I mentioned earlier, tuning forks. A tuning fork is manufactured to produce a specific tone. That is their sole purpose.
Nice explanation on YouTube.
Tuning your guitar is a matter of simply tightening or loosening the string using the tuning pegs. By turning your tuning peg so that the string is further wrapped around the peg is tightening the string and thereby making the pitch (or sound the string creates) “higher”. Conversely, turning the tuning peg so that string is actually relieved off of the peg is loosening the string and causes the pitch to be “lower”.
Tags: beginnings, guitar, parts, theory
I just got the guitar…now what? (part 1)
Oct 22, 2009 Music Theory
Congrats…condolences…you just got a guitar!!!
Guitars are without a doubt the coolest and sweetest instruments ever created by man!!! Take the piano for instance, there is only one place on the piano that you can play the E note an octave and a half higher than middle C. One place? On the guitar, you can play that note in 5 different places on 5 different strings. Because of the way the guitar is tuned (in fourths – explanation coming soon), there is an amazing number of ways to approach chord construction.
So the guitar is the first instrument you’ve ever had and you thought when you saw it in the store or under the Christmas tree that I can learn a couple of chords and it’s off to the beach and and a campfire. Well, yeah, that works if you want to play “Louie, Louie” for a 5 hour period. So what do you do the next day? Truck on down to the Guitar Center and pick up the simplest Mel Bay guitar instruction book. You get it home and start your journey into “Van Halen”-esque stardom. Just make sure you master “Aura Lee” first.
Or…you could pick up a few basic theory rules and start way ahead of the crowd. Probably the reason why you ended up here, so let’s look at some basic stuff.
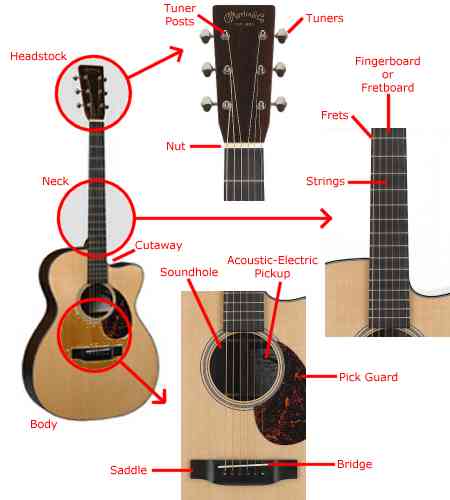
First, let’s start by discussing some common terms for parts of the guitar. Speaking the same language will be very important and a recurring theme in this series. Let’s take a look at some parts.
 |
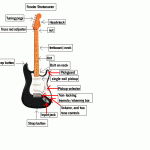 |
Click on the image to see a bigger version.
Ok, that should cover the basics.
Next up, making sound!!!
Tags: beginnings, guitar, parts, theory